All in all I did quite well posting daily. I could not have done it without the help of friends and family. Thank you Abby, Mansi, Kathy, Adam, and of course Tim! Here's a recap of what we did each day this month:
December 1 A Post a Day Keeps the Readers at Bay
December 2 Updated: Like a Cheapskate in a Thrift Store
December 3 Oh Christmas Tree, Oh Christmas Tree...
December 4 When staining something is a good thing
December 5 Blog Roll
December 6 Guest Post: Semi-Homemade DIY
December 7 Monogram Art
December 8 Canvas Art (Fail)
December 9 Guest Post: Personalize Your Space
December 10 Home Furnishings by T. White, Inc.
December 11 Guest Post: A Thankful Home
December 12 Oh Christmas Tree, Oh Christmas Tree... (Updated)
December 13 No Stain, No Gain
December 14 Bath Crashers, Where Art Thou? Part 1
December 15 Bath Crashers, Where Art Thou? Part 2
December 16 Every DIYer's Dirty Secret
December 17 A Cozy Laundry Room
December 18 Gifts for Any DIYer
December 19 A Year in Review
December 20 Let the Maddness Begin!
December 21 Winner, Winner, Chicken Dinner!
December 22 A Toasty Hallway
December 23 Goals for 2012
December 24 Upstairs Bathroom Brain Dump
December 25 Merry Christmas from the White Family!
December 26 Guest Post: A Dining Room Full of Colors
December 27 Don't Drink and Demo!
December 28 Guest Post: Top 10 Painting Tips
December 29 Oops. See two posts below.
December 30 For Sale and By the Numbers
December 31 Today!
Our Cheats: We kind of cheated on December 12th when Tim updated our December 3rd post to include a video of our holiday lights in action. I also updated the Thrift Store post on December 2nd because I finally finished the luggage rack. On December 29th I forgot to post, so I posted twice on December 30th. We also actually didn't do any of these projects in the month of December. I had some ideas planned, but wasn't able to execute them in the madness of holiday shopping and enjoying time with family. Plus posting daily consumed any time that I would have had to actually do projects!
Now that we've posted nearly every day for a month, we're exhausted! Tim and I will be taking the month of January off from blogging. Tim will be furiously working at the turn of the new year at his full time/real job. Then we hope to dive into our bathroom renovations and will need some time to work on those projects before we'll be ready to share. Thanks for visiting our blog this month. We look forward to a year full of DIY projects in 2012 and hope you'll visit us in February!
Saturday, December 31, 2011
Friday, December 30, 2011
By the Numbers
Our first post about our home search began in April of 2010. It wasn't for another five months that we actually searched, found, and purchased our own home and began documenting our DIY adventures. Since October 2010, we've been posting (somewhat consistently) about our challenges and triumps in the world of home improvement. We toss in the occasional life update (like when Sullivan joined our family), home decor post (you've seen many vinyl table cloths in this house!), and celebratory moment (like our Merry Christmas post).
Now that we have a bit of history behind us, I thought I'd share some interesting statistics with you. Blogger keeps track of a whole slew of statistics. I view these periodically to see how we're doing. Onto the quantitative data.
Pageview Totals:
We have had 3,454 all time pageviews since we started the blog 21 months ago. This month alone we've had 1,261 hits! Of course we get more pageviews when we post more. It makes sense that December has been our busiest month in terms of site traffic. I never thought we would exceed 1000 hits in a single month.

Most Commented Post: Kitchen Phase 4
This excludes my own comments.
Most Viewed Post: A European Inspired Bathroom Guest Post
Traffic Sources:
The vast majority of you came from Facebook (597 full version and 81 mobile version) since I started sharing our posts there. Many readers come directly to our blog (142), but we also had a bunch of Google searches (95). Of course I couldn't forget the readers who popped over from The Bernout (19).
Our little blog also popped up on some Google searches! People who stumbled upon our blog from a Google search were Googling the following phrases:
glidden wood smoke (18)
glidden wood smoke paint (10)
wood smoke glidden (4)
chanelleandtim (4)
glidden wood smoke paint kitchen (2)
behr premium plus floor paint (2)
carpet dining room (2)
for vacation and (2)
glidden gray and red walls in a room (2)
glidden painted room (2)
Tons of searches for Glidden paint!
Pageviews by Countries:
This is the most surprising piece of information for me. I assumed that all of our readers came from the United States. While this is true for the vast majority of our readers, we actually have some international readers! Can you believe it? Here they are, by the numbers:

United States 3,232
Russia 67
Japan 25
Latvia 24
Germany 22
United Kingdom 18
Canada 11
India 10
Italy 8
Romania 8
The map shows the shaded areas where we've had traffic. I think part of this can be explained by spammers trying to scam people into visiting other websites or obtain personal information (While we do share a lot of photos and information about our lives, we try to be careful what we put online limiting it to information that could be obtained via property searches, zillow, etc.). I'll be optimistic to assume that some of those readers are genuine!
Of course, Tim and I do this blog for fun. We have full time jobs that keep us busy otherwise. This is just a way for us to share the happenings in our home with friends and family. As always, we welcome you to the White House and hope you enjoy. I hope we can teach you something along the way; after all, we started off as novice DIYers and are slowly accummulating skills. Thank you for visiting our blog and sharing your lives with us!
Now that we have a bit of history behind us, I thought I'd share some interesting statistics with you. Blogger keeps track of a whole slew of statistics. I view these periodically to see how we're doing. Onto the quantitative data.
Pageview Totals:
We have had 3,454 all time pageviews since we started the blog 21 months ago. This month alone we've had 1,261 hits! Of course we get more pageviews when we post more. It makes sense that December has been our busiest month in terms of site traffic. I never thought we would exceed 1000 hits in a single month.
Most Commented Post: Kitchen Phase 4
This excludes my own comments.
Most Viewed Post: A European Inspired Bathroom Guest Post
Traffic Sources:
The vast majority of you came from Facebook (597 full version and 81 mobile version) since I started sharing our posts there. Many readers come directly to our blog (142), but we also had a bunch of Google searches (95). Of course I couldn't forget the readers who popped over from The Bernout (19).
Our little blog also popped up on some Google searches! People who stumbled upon our blog from a Google search were Googling the following phrases:
glidden wood smoke (18)
glidden wood smoke paint (10)
wood smoke glidden (4)
chanelleandtim (4)
glidden wood smoke paint kitchen (2)
behr premium plus floor paint (2)
carpet dining room (2)
for vacation and (2)
glidden gray and red walls in a room (2)
glidden painted room (2)
Tons of searches for Glidden paint!
Pageviews by Countries:
This is the most surprising piece of information for me. I assumed that all of our readers came from the United States. While this is true for the vast majority of our readers, we actually have some international readers! Can you believe it? Here they are, by the numbers:
United States 3,232
Russia 67
Japan 25
Latvia 24
Germany 22
United Kingdom 18
Canada 11
India 10
Italy 8
Romania 8
The map shows the shaded areas where we've had traffic. I think part of this can be explained by spammers trying to scam people into visiting other websites or obtain personal information (While we do share a lot of photos and information about our lives, we try to be careful what we put online limiting it to information that could be obtained via property searches, zillow, etc.). I'll be optimistic to assume that some of those readers are genuine!
Of course, Tim and I do this blog for fun. We have full time jobs that keep us busy otherwise. This is just a way for us to share the happenings in our home with friends and family. As always, we welcome you to the White House and hope you enjoy. I hope we can teach you something along the way; after all, we started off as novice DIYers and are slowly accummulating skills. Thank you for visiting our blog and sharing your lives with us!
For Sale
I seriously forgot to post yesterday. It just wasn't even on my radar. I ran errands, cleaned a bit, went to Ikea, and just didn't think about it. The terrible thing is that I didn't even work yesterday! I think the Ikea trip threw me off. Tim and I went there to purchase our vanity mentioned in this post. We ended up going with a different mirror and I am so excited about it! Of course we'll share details as we renovate both bathrooms. I'm going to post twice today in hopes that you'll forgive me for my little blunder yesterday.
I posted two weeks ago about my dirty little secret, the green room aka project room. As I mentioned during that post, this room is now clean and functional. I briefly mentioned that I had a few items to sell, my computer chair and computer desk pictured in the corner of the photo below. As it turns out, hosting a blog is a great way to sell something because I had two interested parties in no time! Well, I'm back to see if I have any interest for a few more items.

I am now selling the arm chair and love seat (pictured above and below) for $60 ($20 for the arm chair and $40 for the love seat but they come as a package deal, sorry no splitting the items). These are great pieces of furniture for a small space. The neutral decor could match any home! I do really enjoy them and I have kept them in great shape, we just don't really need them. Instead, we could really use the space in this room for assembly and other madness as we embark on our bathroom renovations (mentioned here and here; also here and here). I also have a marker to include that matches the wood, in case you happen to ding it up at some point.
I am also selling the ottoman shown in the photos. It includes the espresso ottoman shown plus the lid converts into a tray table/flat coffee table when you flip it over. It's great for snacks or drinks or propping your feet up. Inside the espresso ottoman there are two smaller foot stools. These can be removed and you can use the larger ottoman for storage. I am selling this item for $60 (including the two inner foot stools). We have owned this for less than 6 months. When we got our new couch, we found that it didn't really fit downstairs anymore.

The final item up for purchase isn't shown. We do have several old Nintendo games and accessories for sale also. Tim has an old school Nintendo and my grandpa gave him tons of games before he died. Don't worry, we're keeping many of them but some are duplicates and some we wouldn't play, so we'd like to pass them onto another Nintendo enthusiast. If you're interested in these games, let me know and we can discuss price.
Wednesday, December 28, 2011
Guest Post: Top 10 Painting Tips
My brother, Adam, is a great resource when it comes to painting. He has been a hired painter and has also worked at Sherwin Williams. Talk about a professional! Whenever I have painting projects, I call him for advice (or to lament about painting the trim). I am definitely a novice painter and have a lot to learn in this department. Adam is here to share his Top 10 Painting Tips:
2. Don’t try to get the most paint out of the roller as you can. If you have to press on the roller you don’t have enough paint on it.
3. Use Tape, but don’t depend on it. When doing your edges use tape if you’re not sure of how steady your hand is but don’t glob the paint on the tape and expect it to prevent the paint from bleeding behind it.
4. You pay for what you get. Yes going and grabbing the 10 dollar gal of paint and the 5 dollar thirty pack of rollers is cheaper but even professionals have a hard time making that stuff look good, why make it harder on yourself.
5. Keep your edges wet. (If Painting from left to right) I don’t care how slow of a painter you are, as long as all of the paint furthest to the right side of your wall is wet, it won’t matter. Problems occur when one part of your wall dries faster then another and then you paint back over it. Like when you do all of your edges first and then come back and roll. Just do a little section at a time.
6. Edgers are usually more trouble then they are worth. Paint does and usually will get everywhere (This even happens with professionals). So what makes people think that paint won’t get on the edge of their tool and then what good is it doing? If you do use them, just make sure to keep your edges clean and that paint is only going on the edger pad.
7. A good brush is worth its weight in gold. Not only does it make a difference in how easy it is to do your edges but good brushes hold more paint, and mean fewer trips to your bucket.
8. When doing drywall patches, less is more. Great dry wallers rarely sand. It’s a lot easier to put on another coat of drywall mud then it is to fix a splotch of it that has already been painted over. Also use a sanding block or sand paper and fade in the edges of your patch so that there is a transition from the wall to your new patch. Once you are happy with it, take a brush full of paint and cover over the patch before you start painting, and then by the time you get there it will have dried and will blend in a lot better with the rest of your wall.
9. As one of my old bosses would say “Put the paint on the wall like your daddy owned the paint store”. You don’t want to put the paint on to thin or it won’t cover and then either it will need another coat or you will just have walls with the previous color showing through a little bit. Put the paint on as thick as you can without it running (which you should be looking for while you are working). Buying more expensive paint usually helps with this as it is not as runny.
10. When painting dark colors, or when doing a significant color change, use primer, and have the paint store tint it gray. Black reflects less color, so you see fewer issues. Primers help the next coat bond to the wall and help prevent paint from running. Paints are meant to form a protective and smooth surface. Yes you can buy paint and primer in one, but in my experience they both end up doing a little less then what they do on their own.
Edging tip: run out a section about 3 to 4 feet about 3 inches from the edge you’re trying to paint. You don’t have to be neat you’re going to be rolling over this later, so just glob it on. Once this is done take a good brush full of paint and start back at the beginning of the area you are painting. This time start about ½ and inch away from your edge and then start working your brush into the wall a little bit so the brush fans out some, and then just start moving your brush up to your edge. Take it slow and allow the brush to find a groove in your wall or door (There usually is one) and drag it down your wall until the brush starts running out of paint, and start all over again, doing the same thing until your area is all edged in.
Here's a little bonus tip that I found on Pinterest:
 |
| Image from here |
That's right, stretch a rubber band around a paint can to help wipe the brush. It keeps the side from getting gooped up with paint. Also, you can put a small nail hole in the rim of the paint can to help the paint drip back into the can after you pour it. I hope these tips help as you embark on your painting projects! Thanks for the great advice Adam!
 "Pin It")
Tuesday, December 27, 2011
Don't Drink and Demo!
Chanelle's step-dad Steve was kind enough to do a short youtube video detailing his tips for demo. He has assisted Chanelle's Mom (Cathy) with several large projects (kitchen, garage, bathroom, dining room) and his specialty is tearing stuff up! We hope you enjoy this video as much as we did shooting it!


Monday, December 26, 2011
Guest Post: A Dining Room Full of Colors
Once again, Mansi is back to share decorating advice, this time for her dining room. I love her sense of style and personalization. She said this is my Christmas gift, so to the readers of The Whites blog, enjoy!
To help out Chanelle during these final days in December,
I’m going to share some things we’ve done to decorate our dining room.

We bought street art on our Europe trip to decorate a large
wall in our dining room. I find art to be
very expensive so street art is a good compromise because they’re cheap but still
seem like “art” because they are technically from Europe. We bought the frames separately (2 from
Joanns and 1 from Office Max). They are still in the same color family and I
think the slight differences in the frame add more “character.” We like to hang our frames asymmetrically to
avoid them looking too much like a boxed set of frames (even though I did just
that with my photos in the living room). Not sure if the asymmetry helps with
that but we like to think so!

We also framed this drawing made by my husband’s friend. I
love how the frame has an “antique” look to it since my house is old. In my
opinion, art and home décor pieces are so much more meaningful when it’s made
by a friend, souvenir from a trip, etc. I wish I could commission Tim’s dad to
paint my favorite flowers (hint…I love daffodils!).

To add another type of “texture” to the room, we put up
metal sconces that we got for 9 bucks at the random stuff aisle in our local
grocery store. I added some red candles for the holidays and figured I can
change the color to accent different colors.
Also notice the red vase with poinsettia and berry branches. I try to
change the vase each season – so far, I have flowers for spring and winter/Christmas.

Notice the pig shaped cutting board and the pig grill on our
buffet table. My husband loves pig-themed things (as well as pork and bacon) so
while I wasn’t too thrilled about these in the beginning, it does make me smile
when I see them. I tell myself that home décor doesn’t always have to look like
a Pottery Barn catalog! The red plate is our last name in Chinese. My husband
made that at one of those pottery-paint places. I made a large serving bowl
that I keep on our dining table in the summer. Once again, they’re not
professional pieces, but they’re functional and personal!

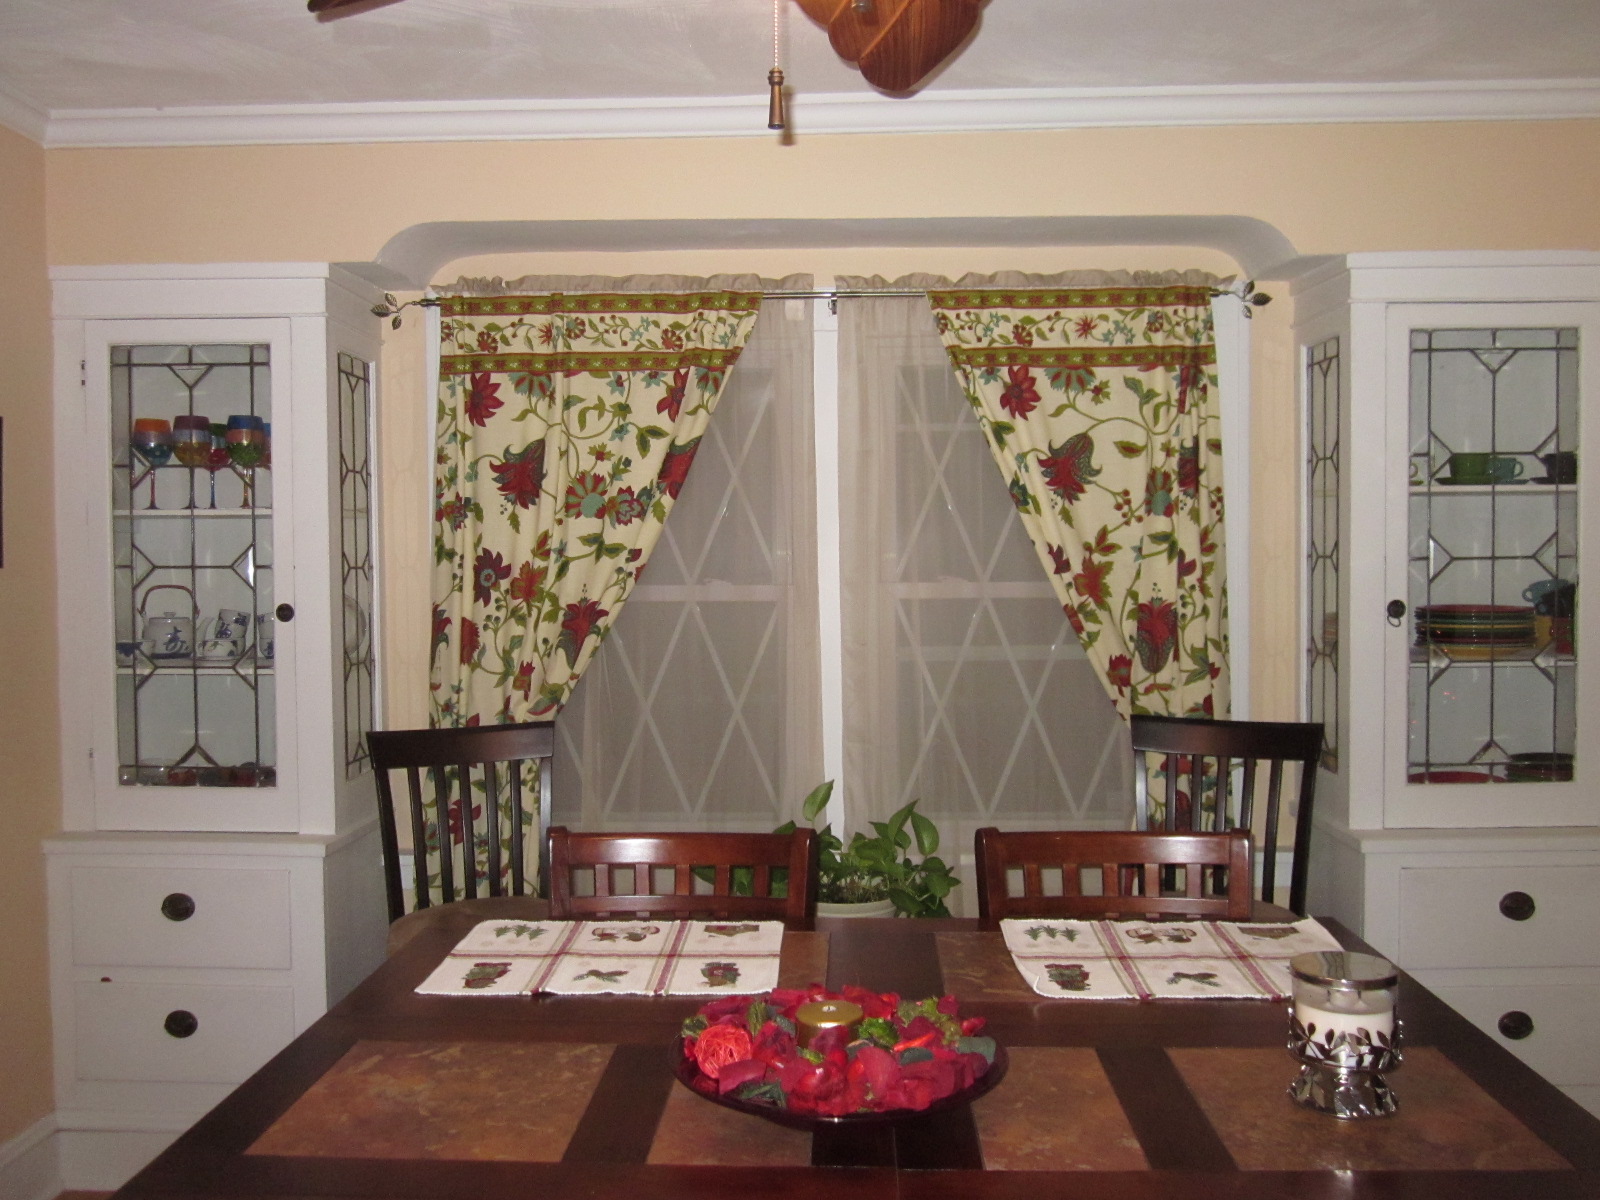
Lastly, while Chanelle loves bedding, I love placemats! I
have a set for every season. The first is my autumn/Thanksgiving set. If I
don’t have flowers, I usually set a bowl of potpourri in the middle. The bottom
is my holiday set. I always get my placemats right after the season and it’s a
quick way to change up the dining room.
Also note our curtains from World Market. I love these because they are colorful
and tie in the various colors in our dining room (and priced similarly to other
window treatments). Hope something here
sprouted an idea for your home!

Sunday, December 25, 2011
Merry Christmas from the White Family!
We hope you are enjoying a restful day with family. Merry Christmas!

Tim, Monkey, Sullivan, & Chanelle
Saturday, December 24, 2011
Upstairs Bathroom Brain Dump
As I mentioned before, we have zero items purchased for this renovation. We remain undecided on many items, including the color scheme and vanity which are two factors that will dictate the rest of the purchases. My mom suggested a new vanity with two sinks. The problem is that the space is so tight (less than 4 feet in width) that we weren't sure it would fit. The bathroom includes a very nice linen closet, so the space for the vanity isn't very wide. Then Tim saw this great vanity at Ikea during a recent shopping trip. He then went on the Ikea bathroom planner and mapped out a few options. I made this little sketch today (via the Ikea Bathroom Planner):

This image includes a two bowl sink, two faucets, a two drawer vanity, and a mirror cabinet for a total of $653. Plus, it fits in the tight space! The only change in this image that we predict is the mirror. We know that we want to have a large mirror above the vanity, but this mirror is probably too tall. We have an existing light fixture above our current mirror that we plan to keep (the light that is).
As for the color scheme, we know we want something earthy. Tim loves the natural stone look of the tiles in my mom and Steve's bathroom. We're thinking of a chocolate/dark brown, white, and natural stone color scheme for the bathroom. Perhaps a tile like this?
 |
| Image from here |
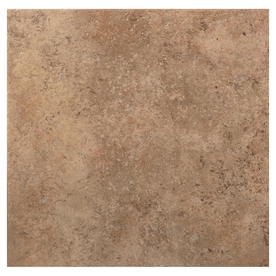 |
| Image from here |
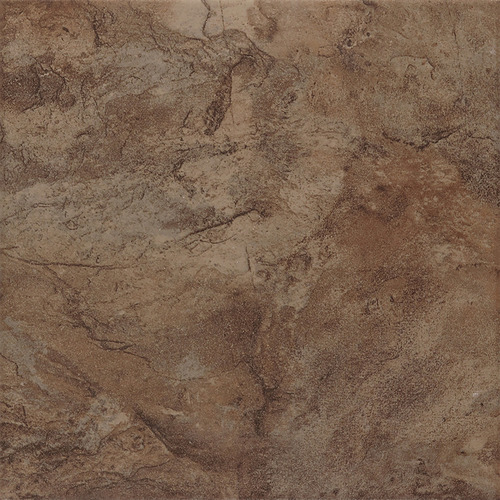 |
| Image from here |
Maybe not that exact look, but something similar in terms of the earthiness and tanish-brownish look. I'm thinking of a small tile backsplash between the sink and mirror, but this is definitely still a maybe We also plan to install a shelf in that space as well. This will be helpful for toothbrushes, hair items, etc. This was a great idea that Tim had since we'll be losing a bit of counter space with the installation of a two-bowl sink rather than 1 bowl.
I've also considered adding wainscoting, but again we're still pretty undecided on this matter. In terms of wall color, we could do chocolate, tan (we currently have an extra can of Behr Burnt Almond at our house), or white. Those are the ideas for now! Let us know what you think.
I've also considered adding wainscoting, but again we're still pretty undecided on this matter. In terms of wall color, we could do chocolate, tan (we currently have an extra can of Behr Burnt Almond at our house), or white. Those are the ideas for now! Let us know what you think.
Friday, December 23, 2011
Goals for 2012
A few days ago, I reviewed all of the posts we had in 2011 (well, January to November). As I reflected on this year of progress in our first house, I was shocked at all we accomplished in 15 months of home ownership. We certainly achieved more than I ever thought possible. We've tackled some ambitious projects like our kitchen, dining room, and paver project. We learned new things about plumbing, electrical, and tiling.
We hope to put our new skills to good use and to put a few more DIY projects on our resume. With that in mind, we set our sights toward 2012. Here are some of our goals for 2012:
1) Lower level bathroom renovation - As Tim mentioned in our previous post, we've already purchased a vanity, faucet, and storage unit. Plus we installed a new light fixture a while ago. We still need flooring (TBA), wall paint, and a toilet. We will also be installing new trim and a mirror (purchased at Valley Thrift for $3-- we think this one should work perfectly).
2) Upper level bathroom renovation - Unfortunately, we have zero items purchased for this renovation. More on this project in a future post.
3) Decorate our bedroom - At this time, it has wall paint. Future plans include a DIY headboard (probably another upholstery project), wall decor, window treatments, and trim paint. Ideally, I'd get the trim finished in 2011, but with the clock ticking to close this year, I'm trying to be realistic.
4) Paint the living room - We've actually been doing a pretty good job of getting some decor on the walls in this room, but we have yet to paint them! The carpet is in pretty good shape, so it just needs shampooed. We'll have to choose a wall color plus paint the trim semi-gloss white like the rest of the house. Thus far, we've not done this for fear of ruining the carpet.
5) Decorate the green room - It's now more functional, but we hope to make it a great space. I'm not sure what exactly that will mean in terms of decor, but we know the walls need something.
6) New carpet - We will be carpeting the upstairs: all 3 bedrooms and the hallway. We've already chosen the color, Shaw's Pecan, and can't wait to order it!
7) Craft Projects - I plan to make some homemade art for the upstairs bathroom or green room. I also want to revisit my failed canvas project. I have some random picture frames that I hope to paint and make into a gallery wall for our hallway or bedroom.
8) Landscaping - This area is severely lacking. We've done a few projects here and here, but there's still major work to be done in this department. I plan to add a window box to our kitchen window that will be an herb garden. I will also replant the front flower bed. Other than that, my landscaping skills are slim. I don't know what we'll do to improve the look of our yard, but I hope something!
I'm sure there will be other projects that we'll tackle along the way, but that's what's on tap so far in 2012. Of course the bathroom renovations will be a huge undertaking!
Thursday, December 22, 2011
A Toasty Hallway
Back in October, we worked feverishly to finish our hallway in time for Halloween. I realized we never posted our new color choice-- Behr Toasted Wheat. This was a HUGE project. The old color was builder beige just like the rest of our house. It actually wasn't a bad color, but we had no paint to fix the dings in the walls from move in day. The color of the hallway is tricky because it can be seen from every room:


Tim also stained the handrails the some color as our other staining projects. It really gives new life to the old handrails. We used new hardware and patched up the wall where the old hardware was. Tim also cut a few inches off the upper handrail. It used to protrude into the dining room and I would always bash my hip on the end.

The absolute worst part about this was the trim. We painted this before we painted the walls. It required a coat of primer and 3 coats of America's Finest Semi-Gloss White (that we've used to paint all of our trim). With three bedrooms, a bathroom, and a closet, can you imagine how much trim we had to paint? Plus the baseboard! Least. Favorite. Project. Ever.

We have one of these vents in each of the bedrooms and each hallway. Tim had some leftover white spraypaint, so we cleaned and painted the vents rather than replacing them. They look brand new! This photo is the best representation of the color. It is warmer than the old color, but is still very neutral to tie into the rest of the rooms. Unfortunately, we did ding up the walls again when we moved our new couch downstairs, so we've got a bit of touch up painting to do.

Wednesday, December 21, 2011
Winner, Winner, Chicken Dinner!
Has anyone seen the movie 21? That's where I learned the phrase "Winner, winner, chicken dinner." That's besides the point...
I won something.
You read that right. Me! I actually won something! I couldn't be more excited!!! One of my favorite blogs, 7th House on the Left (featured in my Blog Roll post here), recently hosted a giveaway to WallQuotes.com. The giveaway is no longer accepting entries, but you can see the winners (including me) listed on their post.
The 3 winners received a $50 gift certificate to WallQuotes.com courtesy of Belvedere Designs. Does this sound familiar? It should! I've already ordered from WallQuotes.com before and love the design I chose:

I can't wait to order something else! Now I just have to decide what and where... Should I put it in the green room, our bedroom, the bathroom? Decisions, decisions.
Thank you so much to 7th House on the Left for hosting this giveaway!
Tuesday, December 20, 2011
Let the Maddness Begin!
Okay, so it's not quite March yet. But I figured it was time to get the maddness started! Below are three items that we've purchased for our downstairs bathroom project. Our plan is to finish this bathroom over a weekend (I plan on starting January 13th and finishing January 15th). It can be done! The bathroom is small and our changes are "minor." I use that term loosely because even a minor reno can turn into a nightmare! On to the items...

Chanelle purchased this item from Home Depot. It's our vanity down stairs and comes with the cabinet and vanity top. Should be a pretty easy install.

This is a gift from Chanelle's Mom (Thank you Cathy!). She bought a combo sink/cabinet/faucet for her bathroom reno, but had her heart set on a different faucet. Lucky for us! This will fit perfectly with our decor for this bathroom. Plus free is always the right price!

And in our never ending search for storage, we purchased this over-the-toilet shelf unit. I liked that it does not have doors and the items can be easily accessed. This should be a hit!
A few items left to purchase before we start: vinyl flooring, toilet, base trim and paint. I cannot wait to get this bathroom reno started!

Monday, December 19, 2011
A Year in Review
As the new year approaches, I thought I would write a wrap-up of all of the projects we completed in 2011. Since I'm still writing a post a day through the end of the year, I am going to include January-November 2011 and I'll summarize December later. I can't believe the projects we've accomplished, progress we've made on the house, and number of blog posts I've written!
January
Merry Christmas - Our home decked for the holidays last year.
Kitchen Phase 3 - Priming and painting the cabinets plus installing new hardware.
Happy Valentine's Day - You know I love a good vinyl table cloth. Our Valentine's Day decor.
Window Treatments - We finally hang curtains and blinds.
Kitchen Phase 4 - Tile backsplash! WOW!
Visitors - Dogs a plenty plus a few humans.
February
Lights, Camera, Action! - Alex installs some new light fixtures.
Kitchen Phase 5 - Wall paint.
Kitchen Before and After - Wow, huge transformation!
Dining Room Phase 1 - Onto the next project we go.
Happy St. Patrick's Day! - My favorite holiday.
Dining Room Phase 2 - We finally get rid of the nasty carpet and Tim installs laminate flooring.
March
Dining Room Phase 3 - Our first upholstery project, a bench for the pups.
April
So sad, we actually didn't post anything in April.
May
Lights, Take 2 - Rex and my mom help us install more light fixtures. I couldn't be happier!
The Saddest Yard - It gets a little love.
Dining Room Phase 4 - New trim. Why did it take us so long to get this done? My wonderful husband ended up doing this all by himself.
Mirror Mirror on the Wall - A great project featuring my favorite store, Valley Thrift.
Death to the Dirt Pit - This may be my favorite project for functional reasons. My dogs still track dirt in, but now it's less.
June
Snap into a Slim Trim! - Framing our upstairs windows with trim.
July
Old, New, Borrowed, Black? - We refinish a hutch that used to belong to my grandparents.
A Room Fit for a Guest! - The first room to get wall decor in our house, the guest bedroom.
Green with Energy - Bedroom #2 gets a new look.
Guests at the Whites - A call for guest bloggers.We have hosted several guest posts and are always looking for more. Interested? Send me an email.
The Bernout: Guest Post - The lovely L of The Bernout shares her strategies to decorate a room on a budget. Love it!
August
A European Inspired Bathroom: Guest Post - My mom stops by to share a MAJOR bathroom renovation.
September
A Magical Vacation - Photos from our 2011 Disney trip.
Like a Cheapstake in a Thrift Store - An old director's chair gets a new life.
Garage - Tim builds a work bench with his dad and organizes our garage... again.
Laundry Room Mini-Makeover - My least favorite room in the house gets a cover to conceal the madness.
October
A Ton of Concrete Later - Tim quite literally pours a ton of concrete out back.
It Takes a Lifetime - to decorate a house!
November
Guest Post: Score, Spray, and Scrape! - Mansi shares advice on removing wall paper.
Guest Post: From Ugly Kitchen to Zen Garden - Mansi is back for round two. You wouldn't let her get away with not sharing before and after photos!
True Blue - Our bedroom goes from builder beige to beautiful blue.
There you have it, 34 posts in 11 months. My December daily posts should come close to my annual posting level. I'll be back toward the end of the month to recap this little project (only 12 days left!).
Sunday, December 18, 2011
Gifts for Any DIYer
Tim and I tried to finish up our Christmas shopping today, so I thought I'd round up a small list of gifts for any DIYer. I hope this inspires you to think of some purposeful gifts for the DIYer in your life. Enjoy!
1) Gift Cards- This is a no brainer. This gift allows the recipient to pick out the perfect accoutrement to their project.
2) Paint Tools- Anyone can paint, from novice to expert. I recommend the following products: Shur-Line Paint Edger and Refill Pads, Scotch Blue Painter's Tape or Frog Tape (I don't have a preference, for brand but I recommend the 1 inch width), Fine Grit Sandpaper, Spackle, and a beginner's pack of painting supplies (I didn't buy the expensive kind but that's up to you. Here's an example).
3) Wall-Hanging Hardware- Buy a variety pack of nails, brackets, anchors, etc. I also use Command Hooks, especially for seasonal decor. Perhaps my Residence Life days have influenced me, but I like blue sticky tack. This is great for securing the corners of frames so they don't move and get lopsided.
4) Tools- Who doesn't love tools? This could be on the Christmas list year after year because you can never have enough! This gift could be small like a screwdriver set or large like a table saw. Many of our power tools are Royobi because we purchased a great combo kit when we bought our house.
5) Pencils- We never seem to have enough. The large, thick carpenter pencils are the perfect tool for every project. We usually get ours for free when we shop at Pease. The home improvement stores sell them for around $20 each.
6) Caulk- I'm obsessed. This might be my favorite DIY tool and it's a recent discovery. I will share a great trick later in the month using caulk. You need two varities: Clear Silicone II Kitchen and Bath and White, Paintable Caulk.
7) Spraypaint- I am a firm believer in spraypaint. You can use it for hinges, wood, anything! There are 4 colors that I think any DIYer could use: white, black, brown, and silver. There are a number of craft or home improvement projects with these four colors. So functional, so easy.
8) Screwdriver and Hammer- I know I mentioned tools above, but these two require special mention. Tim always uses his all-in-one screwdriver (like this one, but that's not the exact one that we have) and of course a hammer. These are great ideas, especially for an apartment-dweller.
9) How To Books- While we do love the magic of google, it's nice to have a step by step how to book including photos. My grandpa had a great set of books for the home. It was a multi-volume set with books on a variety of topics. We've consulted electrical, plumbing, and landscaping so far. My mom currently has these in her collection and we love to borrow them.
10) Safety Gear- Protective eyewear includes two varieties: one that fits over prescription glasses, the other that fits normally without glasses. Masks are important when you're dealing with any kind of toxic chemical, dust, or other debris. We don't have anything fancy in this category. Simple gets the job done! Gloves are essential. They should fit snugly, protect the hands, and have rubber/textured palms to maintain solid grip.
Saturday, December 17, 2011
A Cozy Laundry Room
Another mini-upgrade is now in place in the laundry room:
 |
| Any guesses? |
No idea what I'm talking about? Look down:
 |
| A new rug! |
I've been struggling with the flooring in the laundry room. It's easily my least favorite room in the house. The ceiling isn't finished, the floors are dingy, and there are BUGS. I think I've made it clear how I feel about bugs in this post. I want to make it better, so I did a few small upgrades here to make it feel a bit more integrated and cozy. The floor is concrete like a garage, but it does have yellow paint on it (slightly visible in the upper left corner of the above photo). Yellow may have been the worst choice possible. It's so light that it's easily tarnished by paint droplets, dirt, and anything else that creeps it's way into the laundry room.
I consulted with my stepmom Tammy of Houpt's Carpet Outlet. We discussed possibly doing Flexitec in this room. Tammy informed me that it wouldn't be a good idea to put any flooring product (Flexitec or otherwise) under the hot water tank and heat system. I thought instead of doing flooring, I would do an epoxy treatment like you would do for a garage.
My friend Mansi had the fantastic suggestion to add a rug for some foot comfort without the commitment to covering the entire floor. I thought a 4x6 or 5x7 rug should do the trick. The one problem: I'm cheap. I looked at several places, including discount stores like TJ Maxx and found rugs ranging from $50-$300. This was a bigger financial commitment than I was willing to make for my laundry room rug. I wanted something neutral to match my curtains (seen in the corners of the above photo and on my prior post here and cheap, my #1 prerequisite.
While doing some Christmas shopping on Black Friday, my mom and I went to Big Lots. I have to say that Big Lots is one of my all time favorite stores. They were even having a promotion, buy $50 worth of products and get a $10 coupon redeemable in December. I found my rug for... wait for it... $19! It was a 5x7 rug for $19!!! Are you amazed? Me too. I thought my search for the perfect rug was doomed to fail. No, Big Lots you saved me. And I thank you. They had several other options for $29 as well, so if you're looking for a rug start with Big Lots!
That's the story of a tiny laundry room upgrade in way too many words. There's still more work to come in this space: added shelving/functional storage, epoxy treatment on the floors (I'll still probably do this at a later date), and finishing off the ceiling with a drop ceiling (?). More details on that as I get around to it... :)

Friday, December 16, 2011
Every DIYer's Dirty Secret
When you DIY, you are bound to have one project room that looks like this:
 |
What IS all of that junk?
|

Does this resonate with my fellow DIYers? For some of you it's your garage, others have an extra room, or a basement to store this stufdf. I finally got around to cleaning this room for several reasons really: 1) This is a fire hazard. I couldn't walk in this room it was so messy! Most people know that I don't kennel my dogs because I'm paranoid there will be a fire and they won't be able to get out. 2) I'm a neat freak. My mom is shocked and amazed because my room looked like the above photos throughout much of my childhood. 3) I wanted to make this space more functional for guests, a project/craft room as it was initially intended, and I needed a landing space for my misplaced downstairs furniture. More on that here.
Some of this stuff went to live in the underbed storage in the guest bedroom, some in the guest closet (namely the additional guest twin bed), some in the garage-- projects that just needed cleaned up and put away, and items to donate to Goodwill or Restore.
Most people are familiar with Goodwill. This is a charitable organization that supports a diverse group of individuals, but they are most commonly known for employment and aid to people with developmental disabilities. A less familiar charitable organization is Habitat for Humanity Restore. This donation driven program is supported by individuals and retailers. The products include gently used (or in our case sometimes unwanted but unreturnable) building materials. This is just a friendly reminder this holiday season to donate that old t-shirt or ceiling fan if they are still in good working condition.
Here are the afters with just a little good old fashioned cleaning (well, picking up mostly):
 |
| View from the doorway |
 |
| View from the closet |

What a huge difference. I can't believe I ever let this room get that nutty. I know I wanted it for a DIY/craft/project room, but that was insane. It wasn't even functional. You can still see a bit of miscellaneous stuff on the computer desk. Most of that consists of projects that need to be taken care of: sell the desk and chair (any buyers? $20 each), sell some old Nintendo games (any buyers? price varies), several frames that need hung/new pictures/spray painted, and some in process craft projects (like my failed canvas attempt). My grandma gave all of the old school Nintendo games to Tim when my grandpa died, but both Tim and my grandpa had a ton of games. We still have a collection, but we won't be keeping every single game. There were even some duplicates.
I used my displaced furniture from downstairs in this room. It's at least a functional sitting space. When we have guests (like this weekend), I'll move the furniture to accommodate an inflatable mattress or the fold up twin. A small desk worth of items isn't too bad, but I still need to tackle those items. Now that I actually have room, I will be able to tackle these!

Thursday, December 15, 2011
Bath Crashers, Where Art Thou? Part 2
Part 2:
If you see me or talk to me on a regular basis, it's no secret that I absolutely HATE both of our bathrooms. They are both COMPLETELY original to the 1983 house. I think the only change is a composite sink installed in the upstairs bathroom. And even that is NOT cool. Below are before pictures of both bathrooms, my dislikes and my hopes for change. Both projects are going to commence after the New Year.


If you see me or talk to me on a regular basis, it's no secret that I absolutely HATE both of our bathrooms. They are both COMPLETELY original to the 1983 house. I think the only change is a composite sink installed in the upstairs bathroom. And even that is NOT cool. Below are before pictures of both bathrooms, my dislikes and my hopes for change. Both projects are going to commence after the New Year.

Bathroom #2 upstairs. This bathroom is larger and has a shower/tub. This will be a FULL renovation. New tile (shower and floor), possible tub replacement, new toilet, new vanity, paint and trim.

The AMAZING floor upstairs. It's a goner.

We have a vanity in mind at Ikea and it's actually a double. To remedy losing the counter space with a double in this area, we're going to install a shelf between the sink and mirror. Again, removing the toothbrush/soap holders.

New toilet; enough said.

I'm excited and NERVOUS to tile this shower! We helped Chanelle's Mom tile her bathroom, but we didn't see the job to completion.

Like downstairs, we replaced the light fixture already. Need to clean that up, remove the medicine cabinet and install a mirror. A BIG mirror.

We have a couple of invisible shelves to install here. Should provide storage and style.

Here is a rough idea of what I want the upstairs bathroom to look like.

Wednesday, December 14, 2011
Bath Crashers, Where Art Thou? Part 1
If you see me or talk to me on a regular basis, it's no secret that I absolutely HATE both of our bathrooms. They are both COMPLETELY original to the 1983 house. I think the only change is a composite sink installed in the upstairs bathroom. And even that is NOT cool. Below are before pictures of both bathrooms, my dislikes and my hopes for change. Both projects are going to commence after the New Year. I'll be back tomorrow to share part two of our bathroom.

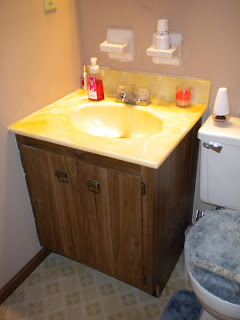


Bathroom #1. This bathroom is downstairs, full bath with a stand up shower. Obvious afflictions: flooring, toilet that is slow to fill, old-dated vanity. The toilet will be a Mansfield Prato from Menards.

Here is the vanity. The yellow bowl is in the shape of a shell. TACKY! Chanelle also wants to rip out the toothbrush holder and soap dish. Both are gross!

This is the shower. The interior is a yellow tile. We're going to keep the tile and work around it. Paint the walls a light grey. I want to replace the water valve as it does not work properly.

I want to replace this light as well. It's dated and does not look nice.

Ugh, flooring. This has to go. The same patern is upstairs only in a sleek green!!!

We already replaced the light fixture, however, the medicine cabinet will also go. We'll install a flat mirror here. We're also going to replace the outlets and put in new trim.

Here is a rough idea of what I want the color scheme of the down stairs to be.
Thanks for clicking through and I hope you all have a great rest of the week!

Subscribe to:
Comments (Atom)