Wednesday, July 20, 2011

The Bernout: Guest Post

I am excited to announce our first guest post, my lovely friend L of The Bernout

Chanelle, L, & Jane
L and I had the good fortune of attending graduate school together and she has since married the Professor and welcomed a beautiful baby girl, Rivka Joy, to her life. L is a fellow blogger, chef extraordinaire, and DIY addict. Without further adieu:

Hello, The Whites readers! I am thrilled to write a guest post for Chanelle and Tim, and I narrowed the topic down to decorating a room on a budget. Let me take you through my thought process when I recently decorated my daughter’s room. Even though this particular room is a nursery, you can apply the rules to any room in your home. First, a gratuitous picture of my chubby-cheeked baby since I am a proud mama:


…and now an actual picture of the finished nursery project:


Fun and modern for a nursery, no? I am pretty impressed with the outcome, especially since my husband and I barely spent $500 for a room that started out as a bare canvas. My husband (affectionately known as “The Professor” on my blog) obtained his PhD a couple of years ago, and I also have a graduate degree. This sounds very impressive, but our brains are incredibly expensive. Though we felt financially ready to have a baby, this did not mean that we had buckets of money to pour into décor. Here are the down-and-dirty tips.


1. Invest your money in paint and textiles: These two things change everything in a room, so if you really want a change in décor, here is where you can make the biggest impact. We chose a light aqua color (Behr Premium Plus “Windwood Spring”), and the paint instantly gave the room a serene feel. For a kid’s room, aqua is a color that can easily pair with a variety of accent colors. Think of a color in your home that can work in your evolving rooms; as you get more furniture and accent pieces, will your paint color easily translate with your new style? If so, it’s probably a great choice (and a money-saver for the future).

Quirky, orange prints—such as rows of ducks on a pillow, a hooked starfish pillow, and bold stripes on sheets—keep the room young and fun. We can easily switch out the textures as our girl gets older to create a brand new look. For instance, if our girl turns out to be a lover of all that is pink, a mini makeover will not break the bank.


2. DIY (Do it Yourself): One of my favorite personal touches in the room is a set of three starfish in shadow boxes. I got the idea from another nursery I saw online, and found out that the art cost hundreds of dollars. Hundreds! Needless to say, I went down to my local craft store and purchased shadow boxes, starfish, fancy paper and a glue gun. This chic project was less than $30 (thanks to a 50% coupon), and I can now brag that I made something beautiful in my daughter’s room (besides my daughter, of course—but that goes without saying anything). Everyone is shocked when they hear I made the art myself. Also, one of the best parts about DIY is that I can change it at any time without any negative consequences. So go ahead, take a risk like Chanelle and spray paint the trim to your mirror!


3. Utilize what you own: We only have two bedrooms in our current place, and we did not want to throw out a perfectly good queen-sized bed. Keeping the bed in the room meant not having a dresser. We solved this storage dilemma by utilizing the room’s massive closet, and hanging cloth shelves and baskets inside (sorry, we suck a little and never took pictures of this). When we buy a home of our own, we can take the cloth shelves and baskets with us, so it was a great investment. Sure, it might not be a typical dresser, but it works for us. We are glad we never donated the bed to anyone because we do not have to buy a new one for a guest room when we purchase a home.

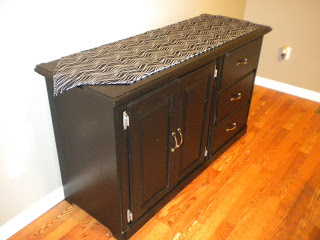
We also wanted to get some sort of nightstand, but we kept going back and forth on various styles. The Professor had a random storage space from his bachelor days, so we put that in the nursery. This stand is a great alternative because we can always spruce it up with new hardware and paint while we decide what to permanently put in the room. Utilizing the unexpected can be a great way to make your place unique and fun. I know someone who uses a chic storage box as a coffee table; the idea is multi-functional and stylish.


4. Use your friends and family (in a good way, of course): Never think you are too good for gifts, hand-me-downs, and utilizing your friends’ talents. My father-in-law graciously offered to buy our crib and glider, and that saved us quite a few pennies hundreds of dollars. Know a family member getting rid of an old, floral couch? Take them up on the free piece of furniture and invest in a nice Pottery Barn slipcover.


We have a dear friend who is also a children’s illustrator. He generously offered to draw cartoon pictures of our dog for the room. If you have a friend that can provide art—pictures, drawings, collages—it is a great way to get pictures that are cheap (yet meaningful) conversation pieces.


5. Don’t compare yourself to others: Everyone is in a different stage of life; with that comes different budgets. Sure, $5,000 couch your brother-in-law owns might be comfy, but do you know what is even better? Knowing that you aren’t scrambling for pennies every month because of your out-of-budget purchase. Do what is right for your own personal situation.

There you have it, folks! I should warn all of you that I am terrible at conclusions, which is probably why I write poetry more than short stories/essays/inspirational garbage. To make up for my lack of excellent concluding, here is a picture of our FURbaby, Marshall.


This happens to be one of my favorite pictures of Marshall. He's a statuesque protector of the incredible DIY decor. Aren't those shelves in the background sweet? I am so impressed with L's ability to have a fantastic nursery in a functional guest bedroom- function and style, the perfect combination! Plus, I love the bright colors, but that's no surprise is it? I certainly enjoyed the DIY bliss in Rivka's nursery. No wonder she's so smiley! Now you can use L's tips to transform any space.

Do you have a room makeover, renovation, or tips to share? Submit your Guest Posts to chanellebwhite. @gmail.com

Tuesday, July 12, 2011

Guests at The Whites

Most of you know that we love having guests in the White House, so I thought we could extend that to the blog. Would you like to be a guest blogger at The Whites? We would love to have you! Please comment on this post or send me an email (chanellebwhite@gmail.com) if you've got a DIY project, tip, or room renovation to share.

Upcoming projects at the White House include:
1) another garage makeover to include organization and function (phase 2 if you will)
2) painting the master bedroom
3) wall art in the dining room and living room (yes, we're finally getting around to decorating our blank walls!)

Tuesday, July 5, 2011

Green with Energy

While Tim worked all weekend, I worked on a project of my own! The former guest bedroom, now spare room (as Tim likes to say). It's not the 2nd bedroom or guest bedroom anymore because there's no bed. It's a spare, an extra, soon to be craft and DIY room. I got my inspiration for this room from a tote on etsy (a website for all things handmade http://www.etsy.com/). I lusted over this tote for quite a while before purchasing. It was expensive after all and everyone knows I'm cheap!


The wall color is Behr's Green Energy. I do love Behr paint. It's very thick, so it takes more than they say it will take (I used 1.5 gallons for this room), but the coverage is fantatic, the color selection is amazing, and the finish is nice. No, this isn't a Behr add, I have just had success with it in the three Behr products I've purchased. Back to Green Energy: it's green. No, not pastel green, not hunter green, not neon green, just green. I prefer it that way. It's green without yellow, or grellow. There's no blue in there (other than the yellow and blue combined to make this glorious color). Although we didn't take the bag as a color match, I'd say is perfect. Have you noticed that we like rich, saturated colors? As Tim says, if you're painting you'd might as well make it interesting. Visually another buyer would probably hate our house, but we'll paint when that time rolls around.


The bag has crisp white handles, perhaps a sign for decor to come in this room. It's also earthy, check out that leafy design, perhaps another nod to the future design. Tim doesn't want all of our rooms to be rich colors with white accents. It's possible this room will have light wood picture frames or mini cork boards to break up the walls. I've been busy working on design elements for the guest bedroom and rolling paint on these walls that I haven't really developed a concept for the decor here, but I do see a DIY wall art in my future.

Do you see the slight sheen on this wall below? That's because we used semi-gloss paint. We painted the kitchen ceiling flat when Alex replaced the light fixture and it's well, flat. Too flat. We used semi-gloss on our kitchen cabinets, kitchen walls, and dining room walls. I like the feel of semi-gloss. It's nice and smooth, plus it's great for cleaning! I wanted semi-gloss upstairs because I can picture Monkey or Sullivan getting something nasty on the walls or a DIY mishap occuring the craft room, so I think semi-gloss was the way to go. Plus, our hallway is either eggshell or flat and it feels like it needs lotion. It's not unlike petting a chalkboard. Ick. Who cares if I defy the conventional paint sheen strategies?!


For now, this room has random storage: Christmas, Halloween, luggage, ceiling fans (which need to be installed in both the spare room and the guest bedroom), and items we're toying with the idea of selling including a plush executive desk chair, light wood corner desk, and old school Nintendo games. The ceiling fans are projects for another day, the decor should/will live in the attic, and the luggage could remain (or find a new home under our bed if Tim would ever let me put the dang thing on risers!). If you're interested in the sale items, I know the seller and I bet she could give you a good deal.


Overall this project went swimmingly. Wait, did I just say that? I didn't realize just how long it would take to paint this room by myself. It is larger than the guest bedroom, but we cranked out the dining room in no time. That's right, WE did that. Oh yeah... painting by yourself takes twice as long because you're doing all of the rolling, cutting in, and taping alone. No pity party here. I just always have unrealistic expectations about the amount I will be able to accomplish on a particular project. For example, I had Tim remove all of the doors in the guest bedroom and spare bedroom because I thought surely I could do all of the cooking, cleaning, laundry, shopping, errand-ing, taping, wall painting, door painting, and dog calming (Yeah, they were scared with the fireworks, so scared Sully made himself sick. Literally, sick.) by myself this weekend. To me, that list seemed pretty short, but in reality it took a while. Plus, I stopped and had lunch at Panera in between my shopping and erranding (dropping things off at Hamilton ReStore, quick trip to Pease, and to Michael's for sweet wall art that's coming in a couple of weeks).


Well, everything went well except the trim. It took us a solid month to even start adding trim to our dining room. Tim completed most of that project by himself. I researched this subject and came up with several lackluster ideas. Many recommended removing it, painting, and reinstalling. That sounded like a bad idea on warped trim from 1983. Next. Several suggested shoving a spatula (not the kind for grilled cheese, the kind for spackling) under the trim to press down the carpet. That sounds like a terrible idea. Maybe worse than the first. Who wants to paint a few inches at a time? Not me! Finally, a few lone sources suggested a piece of plexiglass under the trim. Okay, maybe. At least this way you could paint two feet at once.


We have old carpet in our upstairs that we don't really care about, so we decided to cut the carpet back, put some weights on it, paint the exposed trim, and press the carpet back down. We plan to replace the carpet after all of the upstairs paint is done anyway. Done. It wasn't really that hard, just annoying. I'm lying, I have no idea if it was hard to pull back all of the carpet because I sweetly asked the hubs to do it then helped him with the primer and paint. Did I mention that I'm clumsy? Yeah, ask my right pinky that got smashed in the car door by yours truly this weekend. I thought that me pulling back carpet to expose sharp tack strips might be a bad idea.


Okay, so trim is done. Fine. Now onto the walls. Again, clumsy me certainly doesn't have the skill to cut-in all of that trim by hand (I tried in the closet, it didn't look awesome), so I had to tape it. Now I tried a variety of strategies: Frog tape, Blue Painter's tape, let it dry completely, rip it off as soon as you set down the brush while the paint is still wet. No dice. It ended up looking like this:


Maybe you can't see the wiggly lines of crappy painting above the trim. Sigh. I can. And it drives me bonkers. One strategy that I don't hate is the Shur-Line Edge Like a Pro system. I use this for the ceiling. It looks mediocre, but definitely better than my tape system, especially with our textured/popcorn ceiling. Because the ceiling is textured, it does hide the fact that the Shur-Line doesn't get right next to the edge (there is a small, maybe 3 mm gap). Since we already painted the guest bedroom, but not the trim, I think I will try to tape the walls instead of taping the trim and see if that has a better outcome. Does anyone have strategies for painting trim?


Friday, July 1, 2011

A Room Fit for a Guest!

As you recall, we painted an accent wall in the dining room Deep Garnet. We were initially told that it would take a quart. As the quart ran out, I rushed to Home Depot and bought a gallon. Fortunately, that was enough. Unfortunately, we were left with 3/4 gallon of Behr Premium paint and primer in one. We knew we needed to use this in another room because we had a ton of it and because it was expensive. The obvious choice was our third bedroom. It's a small room, but large enough to handle a dark color (vs. the bathroom which would have felt closed in with the dark color). We did have that concern with this room, but went with it anyway!
 
 
Tim had some time and managed to paint the third bedroom back in April. We did very little with it after Easter. Then Tim had a great idea: we should move the guest bedroom into our freshly painted third bedroom. We haven't really utilized the third bedroom yet. It's kinwas a weird space because it was too small to do DIY projects in, but needed to be more than a storage space. Tim thought I could put all of my craft items, sewing machine, holiday storage, etc. in the second bedroom. This will hopefully be more functional for us while we're DIYing everything!


As you can see from the photo above, we finally got some decor on the walls! We've definitely been slacking in that department as we've focused so much on larger projects (kitchen, dining room, paver project, etc.). Don't get me wrong, we're not totally there yet-- those frames still have photos of other people in them! Progress people, progress. The Welcome is made of adhesive mirrored letters. This photo collage is above the bed.


These flowers are 3D, so it breaks up the dark wall with something eye-catching. We placed these next to the window.


Beside the bed I set up a simple nightstand that we already owned (it was in the prior guest room), a new lamp, and my thrift-store mirror.


Again, we repurposed old items. This is our old entertainment center that we've owned for a while. It was sitting in the old guest room. We initially planned to use my corner desk, but the placement of the floor vent was problematic. I think the entertainment center actually works out better. It isn't as deep as the corner desk and provides storage for towels and other items for guests. For now, I stashed some of my craft supplies in the bottom, until I get my act together in the second bedroom.
 
 
We've tossed around the idea of painting the nightstand, entertainment center, and headboard white. I'd love to have all of the furniture match in that space, but I don't want to buy new (for cost, waste reduction, and the fact that this furniture actually fits in the room well-- which is challenging due to the placement of the floor vent).
 
 
I love the crisp white next to the deep garnet. The contrast is striking and creates a posh room, like a swanky hotel! We need to paint the trim, door, and closet doors to complete this room. Oh yeah, and replace the carpet. No big. haha

Old, New, Borrowed, Black?

You may remember this photo from an earlier post. Steve and I worked on refinishing this piece of furniture Easter weekend.
I wanted a large buffet for our dining room. Ideally something that could hold my house plants, provide storage for kitchen items, and be a substantial piece of furniture that I could use as a serving space during parties or holidays. There is a buffet that matches our dining room table, but it comes with a hefty price tag.
Then, a free alternative popped up: my grandparents' hutch. My mom has had it in her kitchen for as long as I can remember. Unfortunately, the hutch is one massive piece of furniture. It's over 5 feet tall and would overpower the dining room entirely. Then my mom informed me that the top detaches from the base. Hmm... this could work.
The base of the hutch has two deep grooves that lock the top into place. We decided to glue a piece of wood into the groove, fill it with wood putty, and sand the top smooth. This was moderately successful. We managed to make a flat surface, but it wasn't without flaws. This could be due to my lack of patience (and Steve's), the high humidity the weekend that we tackled this project, or simply that we were trying to fill a one inch gap with random stuff. Ideally, we'll resand, fill, sand, and paint the top again.
Here's the cabinet with primer on the top. You can't tell from a far distance, but if you look closely in person you can see the grooves.
A second concern was the hinges. We puchased them new, but they didn't quite fit and created a gap between the door and the face of the face of the cabinet. We needed to hurry and get the cabinet doors on before we had guests over, so Tim decided to spraypaint them for a quick fix. As it turns out, you an spraypaint just about anything!
I had this silver metallic spraypaint on hand because I used it to spraypaint our chainlink fence. And yes, that project turned out well. It was a quick fix to spruce up our fence with around $10 in spraypaint. I haven't taken any photos of it, but I should post to the blog.
Here's the finished product. Overall, it looks great despite the snags that we had! I planned to sew a runner for the top with leftover fabric from the bench, but I didn't have enough. Then, I found this cute padded runner at A Sweet Life, a local craft shop in Cincinnati. I thought this ended up being a better choice anyway because the fabric is darker. I plan to put my plants on this buffet, so the darker fabric would hide any leakage from the pots. So there you have it- something old turned new, borrowed from my grandma and mom, painted black!