Friday, May 4, 2012

Going Pro

Apparently we shop at Home Depot way too often because I recently received this in the mail:


Do you know what that is? It's a flyer, mailed to me directly, inviting me to join Home Depot Pro. We purchase so many items from Home Depot that they think we are professionals (I do even have a favorite cashier at Home Depot, Louise). That, my friends, is hilarious and also the farthest from the truth.

Tim and I are definitely ambitious. We take on a lot of projects, like renovating both bathrooms in our home. We're definitely not experts though. Our motto is "A for effort." We begin each new project with a lot of research, namely Google. We watch how-to videos, read articles and product reviews, and ask family members for help. The expert advice of family members has been invaluable in our various home renovations. We don't claim to be experts, but we might be crazy.

Even though I love a deal, we won't be joining Home Depot Pro. I definitely considered it when I received this flyer in the mail; however, I believe that the program has a membership fee. Also, the flyer advertises bulk items like a 12 pack of caulk. I am definitely a huge fan of caulk and it's probably my favorite household fix-it product, but 12 tubes is excessive for one home.

Tuesday, April 24, 2012

Carpet 101

Chanelle and I finally bit the bullet and purchased new carpet for our upstairs. This included 3 bedrooms, hallway and stairs. Most of the carpet up stairs was either original to the house or just dirty beyond repair. My biggest piece of advice for carpet? If you buy a house and think you need to replace the carpet, do it before you move in! Moving furniture out of the upstairs was a CHORE! We're going to shampoo the downstairs in hopes of getting a few more years out of it. Attached are some pics of the carpet. Hope you enjoyed my first mobile post!

Saturday, April 7, 2012

The Little Things

We hoped to update the downstairs bathroom without ripping out the shower, so we're working with what we've got. The pastel yellow tiles are in fantastic shape. The camera lighting is terrible in these photos, so I apologize in advance. It really doesn't read that yellow in person. Though we were keeping the shower tiles, we knew we had to replace the fixtures. They were awful and dated. Tim swapped out the old showerhead for this guy:


Isn't it amazing? Tim chose brushed nickel to match the rest of our house (door knobs, cabinet knobs, etc.). I wanted a shower head with a hose because the downstairs bathroom is our primary dog bathing shower. It's so much easier to give the rascals a bath with the hose attachment. This one is perfect and luxurious. It was a bit pricey, around $45. With all of the cost savings elsewhere, we felt like we could afford to splurge on new fixtures.


Our house had Delta fixtures before. Apparently, it's easier to replace a Delta with a Delta, keeping with the same brand. We purchased this fixture from Menards and it's designed specifically to match with Delta replacement fixtures even though it's a knock off. It also wasn't cheap, at about $40. It was shockingly complex to install because it has instructions for replacing this on 3 different types of fixtures. Who knew this would be so complicated? I did figured it out after slowly walking through the instructions and it couldn't look better! It's amazing what a huge difference $100 worth of shower fixtures makes.


As we've painted each room, we've slowly been replacing all outlets and light switches. We want everything to have a crisp white look when we're finished. It's been a slow process, but we're getting close!


This is the light above the shower. I realize photographing a light is tough to do and results in terribly lit pictures, ironically enough. We planned to replace this recessed light above the shower, but decided it looked good enough after Tim cleaned it well. Again, we're cheap!


While shopping for our faucet at Menards, we happened to find a 3 pack of fixtures for $35. Are you kidding me!? That is so cheap! It's crazy that you can buy an entire vanity for the same price that some fixtures cost. This is where a project will really kill you-- all of those seemingly little items. Shop around for things that won't break the bank.


I wasn't sure about the 18" length of this towel bar, but it works fine. We can comfortably hang two bath towels on it. It does the job, especially for a guest/lower level bath!


I also wasn't crazy about this hook style toilet paper holder. I've only had the traditional style prior and I worried the toilet paper might fall off, but worry not! I've actually liked this better than the traditional style holder. It has a more modern look.


Finally, Tim painted the door and reinstalled it with new hinges and handles. Easy enough? Not quite. It's actually quite a tedious process to prime one side, flip, prime, paint 2 coats, flip, paint 2 coats. AND you have to make sure the door isn't too thick to fit, otherwise you're faced with a sticky door-- a problem we have upstairs. We're still working to resolve that issue upstairs and will let you know when I figure out the magic trick. We decided to paint the doors so all of the doors and trim are a seamless color (America's Finest Semi-Gloss White). Also, we are cheap and replacing them all would have been wowza so much money.

This bathroom isn't quite finished, but the little things make a HUGE difference! We would love to get a new shower door. Unfortunately, it's $200, so that's not in the budget right now. When our upstairs bath is finished, I will purchase new rugs (I've been on the hunt for pastel yellow rugs), get some art in there, and place some scrapbook paper for pops of color. I will post a before and after picture when we're done!

Saturday, March 31, 2012

A Functional Bathroom!

This bathroom renovation is taking a lot longer to post than it took Tim to complete. It took him roughly two weeks from start to "finish." I say "finish" because I still need to purchase rugs, towels, etc. to give it that polished look. In this phase of our bathroom transformation, Tim installs the vanity and toilet.

He was paranoid to install the new toilet. Of course he worried that it would leak-- a very valid concern. He also thought it might break when someone sits on it-- a slightly irrational concern. I don't make fun though because I have a completely irrational fear of bugs of all kinds, especially spiders (I even woke him up in the middle of the night last night, during his very busy season at work, to combat a King Kong sized spider).


We purchased an all-in-one kit from Menards. We opted for this route for 2 reasonses: ease and price. We are extremely cheap after all. It included everything necessary for toilet installation and it was less than $100. We ultimately decided to purchase a different toilet seat because the one included was plastic; we wanted an enameled wood seat.


Tim had already done the hard work: removing the old toilet, scraping up the old wax seal, and cleaning things up. That portion was completed during demo. First, we placed a new wax ring. Then, we had to place the toilet on the floor. Sounds easy, right? Not so. The hardest part of the toilet installation was lining up the bolts in the floor with the holes in the toilet to actually secure the toilet. After multiple tries, we finally managed to get it lined up. Then, you just tighten the nuts on the bolts gently. You don't want to do this too tight, or your toilet might crack-- yikes!


After the base was installed, Tim placed the tank on the base. All he had to do was secure a few bolts. Then, he was able to hook up the plumbing in the back. Then, he held his breath as he turned the water on. You can see our helping girl, Monkey. She has to be involved in EVERY project in this house. She always ends up with paint on her butt, caulk on her paw, grout on her elbow, etc.

Sullivan decided to be a helping boy this time too. He usually paces around our projects nervously or curls up on the couch to wait for a snuggle buddy.


The toilet is done. Tim won't sit on it because he's too scared- what if it breaks, what if it leaks, etc. I sit on it several times and it seems fine... until I hear a big crack. Uh oh. No water leaks and we can't seem to find a visible crack in the toilet, so we think it must be the bolt making a noise. We loosen them and hand tighten them again. I sit down a few more times, another loud crack. Now I'm getting nervous too.

I get down on my hands and knees to inspect the toilet. There are no visible issues with the toilet. Then, I reach my hand behind the toilet and realize what's happened. There are two small cracks in the tile behind the toilet. Tim had to cut out 1/4 of the two tiles behind the toilet (they were shaped like an L) to fit around the drain. The tile couldn't handle the pressure on the two ends of the L, so it broke. You actually couldn't see that it was broken, I could just feel a small seam where I knew one shouldn't be. This was really not a big problem. We just filled in the tiny crack with grout, covered it in grout seal, and called it done.


Now, Tim is finally able to sit on the toilet without fear! I am happy to report that we've been using this toilet for two months without issue.


Whoa! Where did the vantiy come from? Because this bathroom is small, I didn't get any in progress shots of the vanity installation. We purchased a $40 vanity that included the cabinet, knobs, sink, and faucet. An all in one kit again, for a great price. Unfortunately, the faucet was chrome, so we ended up purchasing a brushed nickel faucet to match the rest of the bathroom fixtures. We found that for $26 from Home Depot, thanks to a heads up from our friend Brian.


Tim basically opened a box, took the vanity out, and plopped it in the bathroom. He secured it to the studs. Then, he had to hook up the plumbing, which was a bit more challenging. We purchased a drain, which we realized was the wrong size. Apparently, we were going from a sink drain to a drain pipe that was 1/2 inch larger. Tim thought they were the same size, but after he realized this we made a quick trip back to Menards and got the right size equipment for the job. This sink just uses a compression valve, so we didn't have to weld anything. Easy! Then Tim just hooked up the water lines to the facuet and we were good to go.


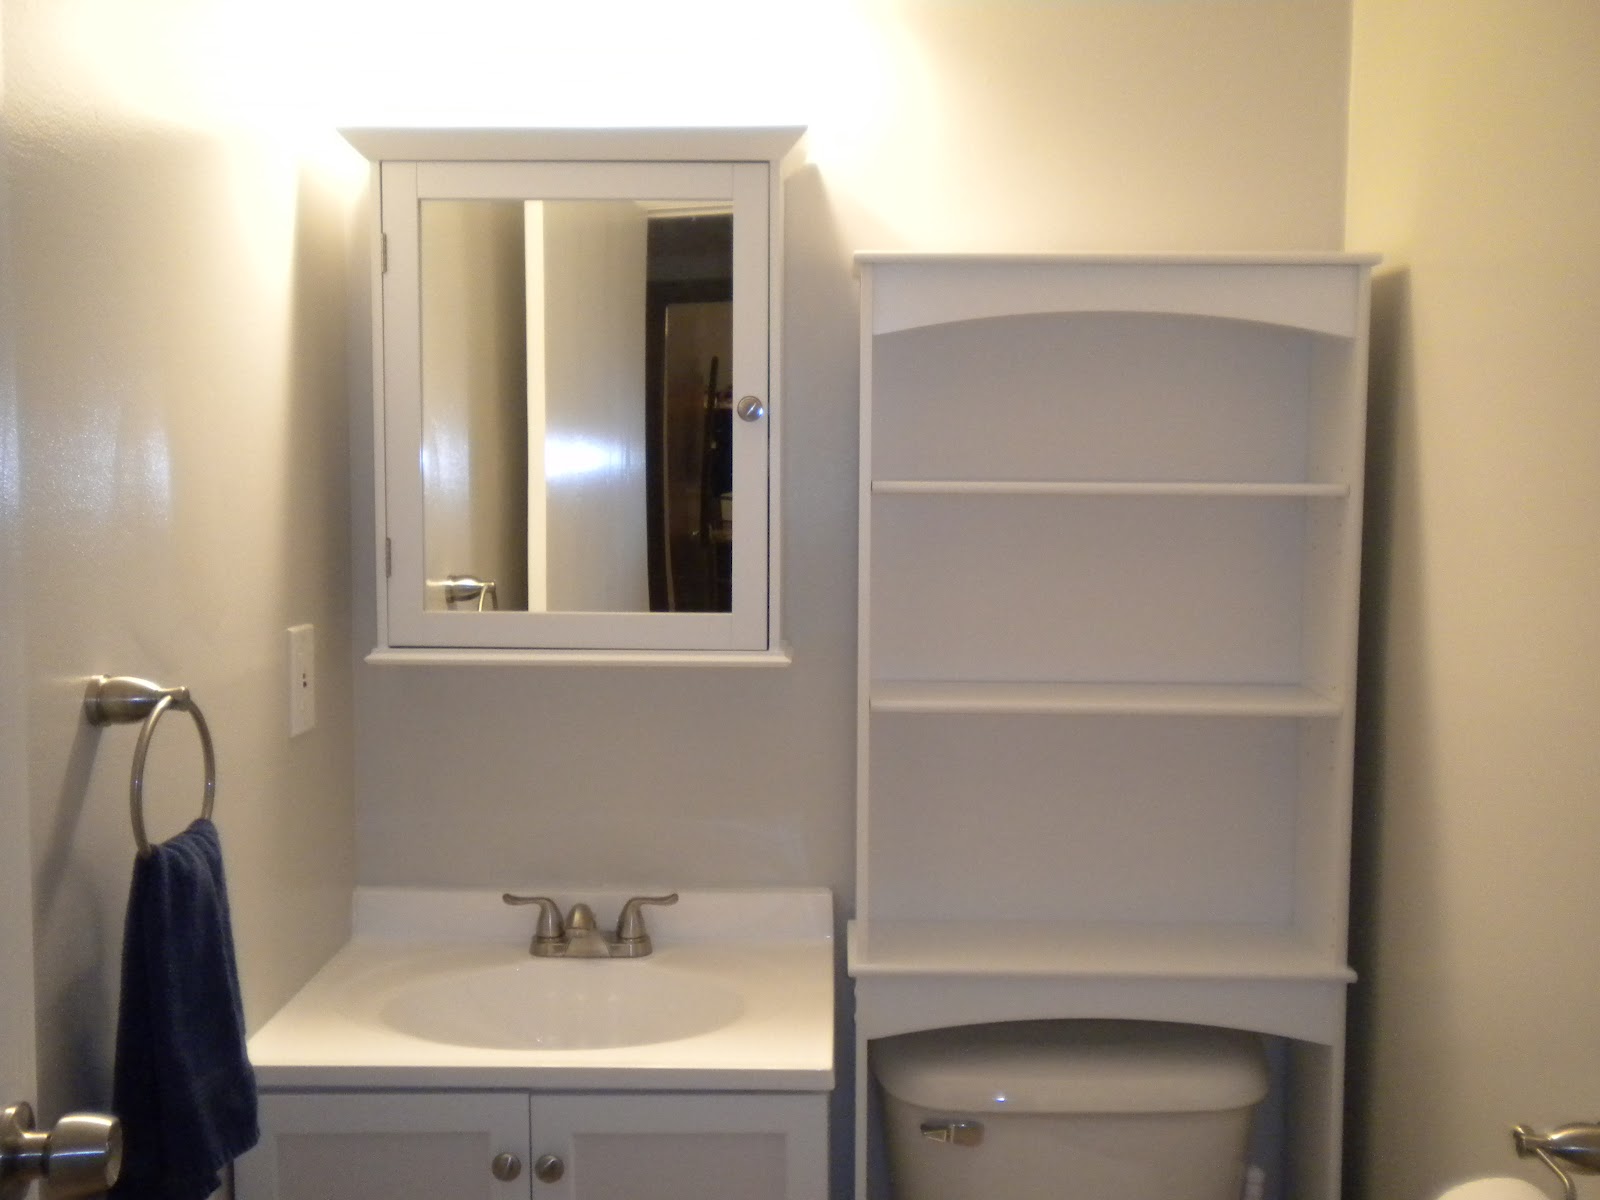
I mentioned our friend Brian a moment ago. He is also an avid DIYer. While we were at Brian and Kathy's house for a party, he invited us to see his stash of leftover DIY materials. Brian renovated both of their bathrooms in the last year also. He had a few remaining parts- new wax ring, old medicine cabinet, lights, etc. So Tim and I went shopping in the "Brian store" to see if we could use any of these items. Brian thought the medicine cabinet might look nice in our bathroom. He was definitely right!

Tim took the whole thing apart (removed the hinges, unscrewed the knob, and took the mirror out). He then spray painted it a crisp white to match the rest of the fixtures in our bathroom. At first, the finish wasn't excellent. He sanded and sprayed it again and it looked great. Tim picked up a new knob from Home Depot to match our vanity. The medicine cabinet did have hooks on the back to hang it on the wall. Unfortunately, these didn't match up with our studs, so Tim just screwed the interior of the medicine cabinet into the wall/studs. When I finally purchase rugs for this bathroom, I plan to get some decorative scrapbook paper to cover the inside of the medicine cabinet for a fun pop of color. Knowing this, he wasn't too worried about screwing into the cabinet.


To maximize storage in this small space, we purchased an over-the-toilet cabinet from Wal-Mart. They had several varieties, but we opted for the open shelving cabinet. It was the cheapest option at just $40, which we of course loved. Tim smartly pointed out that this would be the best option for a guest bathroom anyway.

Since this bathroom is in our lower level, it isn't our primary bathroom that we use to get ready on a daily basis (well, we do right now because it's the only one that's functioning, but that won't be the case in a couple of months!). We want our guests to be able to spot towels, extra toilet paper, tissues, etc. with ease. We'll probably store extra bathing suits (since we have a pool, we keep several on hand for guests), cleaning supplies, dog shampoo, etc. in the vanity; we'd like those items to be hidden from view.

It's amazing how quickly these 4 major pieces were installed-- just one weekend! The tiles and paint took so long, so that I thought surely these bigger items would be time consuming as well. Tim and I were able to use this functioning space now! As I mentioned, I do still have some finishing to do in here. I'll be back soon to share photos of our outlets and fixtures.

Thursday, March 15, 2012

The Dynamic Duo

No, that isn't a reference to Tim and I, though we do make a pretty fantastic DIY team. The Dynamic Duo I reference are our good friends tile and grout. This isn't our first encounter with these two difference-makers. Remember, our kitchen backsplash? Yeah, it totally makes the kitchen. I think tile and grout have that effect on a space. It's something I've just now realized as we are embarking on our third tile project (in the upstairs bathroom... more to come later). Alas, photos await.


Tim first laid out all of the tiles to see how many cuts he needed to make. You can see the spacers in between the tile. We opted for a 1/4 inch grout line. Our friend, Jeremy, was once a professional tiler. He advised us not to make the grout line too small because you will notice slight imperfections more.

Jeremy also urged us to consider 8 inch tiles in a small space like this. We opted for 12 inch tiles from Home Depot called Golden Sand (mostly because we are cheap). We scored them on clearance for $1 a piece! Sorry, don't go looking for them because they are no longer available. We went this route mostly because we are cheap. We initially planned for grey tiles, but found nothing to our liking despite an extensive search. We chose these tiles because they have small flecks of grey/silver in them.


Tim spent his entire Saturday cutting 23 tiles. That's roughly 1/3 of the tiles in this space had cuts.


We also purchased a wet saw from Home Depot. It was only $88, so no this isn't the Rolls Royce of wet saws. They offer the Ford Pinto of tile "saws" if you will-- the kind that score the tile for you to snap. We thought it was worth the expense since we're re-tiling two bathrooms in a few short months. We also purchased the warranty for around $10 which includes repair or replacement for three years. Worth the cost with two majors projects utilizing this guy.


Here's the bathroom with all of the cut pieces included. You can also see the wall color in the back and to the left.


The most tricky cut was a U-shaped cut beside the shower. It took Tim 3 tries before he finally got this cut right. The others were not so tricky. When he installed it, the tile accidentally snapped. Tim had the quick thought to super glue it back together.


And now, a related story:
I laid out some newspaper on our dining room table and carefully super glued it back together. You can't even tell! Then, I walked downstairs to grab the laundry. Upon my return to the dining room just minutes later, I can't find the super glue. I forgot to push my chair in. Panic ensues. I set the laundry down and crawl on the floor in search of the elusive super glue. Meanwhile, I'm shouting "Oh no. Oh no. Oh no." I get louder and louder with increasing distress in my voice.

Tim, "What's wrong?"
Chanelle, "I can't find the super glue. I think Monkey ate it."
Tim "Oh no."
Chanelle "Go open her mouth. Can she open her mouth?"
Tim to Monkey "Open your mouth!" Obviously very effective since she doesn't know this command.

Panic ensues. He does get her mouth open, but we both see white residue. Still no super glue in sight. I quickly call our vet (keep in mind this is actually the Saturday before MLK Jr. day, a holiday) while hopping around grabbing a coat, keys, and putting my shoes on while juggling in the phone, a bowl of water I'm trying to coax Monkey into drinking, and a leash. The entire time I'm shouting, "Get in the car! Get in the car!"

Sigrid from our vet's office answers the phone. "This is Chanelle White. My dog, Monkey, just ate a tube of super glue. What should I do?" I speak so quickly she can't understand me. I repeat myself and she immediately gets Dr. Reagh. Please keep in mind that a) this is a holiday b) this is not the first time I've called Dr. Reagh (the last time he was on call and I called because Monkey was foaming at the mouth because she had licked a toad-- we later learned).

Tim runs out to the car with Monkey. Sullivan follows. He accidentally kicks (not hard) Sullivan in the head in his haste. He puts Monkey down, picks Sullivan up, and puts him in the kennel. We run to the car and get in. I pull out of the garage and we're racing to the 24 hour animal hospital close to our house (closer than the sweet vet who we normally take them to who I'm on the phone with).

Sigrid calmly interprets what Dr. Reagh is saying in the background and tells me not to worry. He's checking. What do you check? Do you check the book of dumb sh*t my dog ate? Dr. Reagh asks me if she ate Gorilla Glue. No, regular super glue.

Tim has been holding his hand inside Monkey's mouth to make sure she doesn't glue her mouth shut. I've been thinking her mouth is glued shut, she'll never eat, she's going to die! Of course I'm distressed. Did I mention that it's around 8 am on a holiday weekend? I haven't showered, I've been cleaning the house, Tim has been tiling, and I'm a disheveled mess.

Dr. Reagh tells Sigrid who tells me, Monkey will be fine. Apparently, the super glue balls up into small pieces and passes normally through the digestive track. As long as she is eating, drinking, and pottying normally, she'll be fine. If not, I should bring her in. I ask about her teeth- her entire mouth is covered in super glue. Her muzzle/lips, tongue, and teeth. Should I have them cleaned? No, it will come off naturally when she eats dog food. You can see a little bit of the super glue on her lips in the photo below:


Oh. My. Thank you God. We (and Monkey) dodged a bullet on that one. Thank God she'll be okay. She licked us apologetically with her super glue covered tongue. We return home and I walk upstairs to put the laundry away. I find the bottle of super glue upstairs, so she didn't eat it. She did bite it though. Apparently, super glue doesn't taste that good, so she decided not to eat it after she got the nasty taste in her mouth. It did take around 2 weeks for the super glue to come off of her muzzle completely. I am happy to report that she is doing fine. Our little mischief maker!

Back to tiling:


Tim did finish the tile that day and he grouted the next day. It took him the entire weekend to finish this project.


Check out how great it looks! Tim worked in small sections to grout, then clean as he went. Notice the baby gate behind him. We are a fan of those in this house because of our two very curious dogs. Monkey especially likes to be a helping girl.


And a picture of our Sully man for good measure. :)